
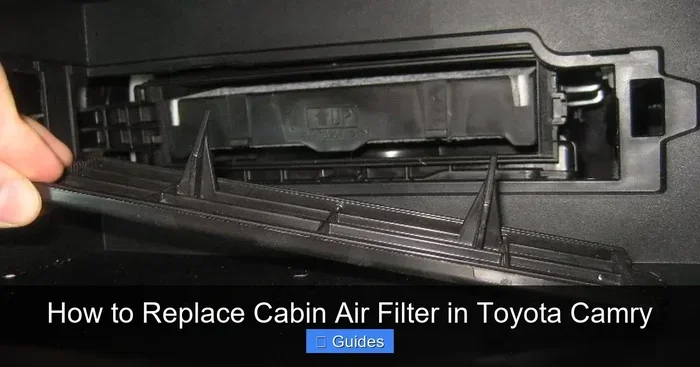
Changing your cabin air filter is one of the easiest DIY maintenance tasks you can do. It takes less than fifteen minutes and costs very little. You will breathe cleaner air and help your HVAC system work better. This guide shows you exactly how to change cabin air filter Toyota Camry without any special tools. Follow these simple steps and enjoy a fresher ride today.
Key Takeaways
- Easy DIY Task: You can replace the filter in under fifteen minutes with no special tools.
- Low Cost: A new filter costs only a few dollars and saves you money on mechanic visits.
- Better Air Quality: A fresh filter removes dust, pollen, and allergens from the air you breathe.
- Improved HVAC Performance: Clean filters help your heating and cooling system work efficiently.
- Simple Location: The filter sits behind the glove box and is easy to reach.
- Regular Maintenance: Check your filter every year or every ten thousand miles.
- Right Part Matters: Always buy the correct filter size for your specific Camry model year.
📑 Table of Contents
- Why You Should Learn How to Change Cabin Air Filter Toyota Camry
- Signs Your Camry Needs a New Cabin Air Filter
- Tools and Parts You Need Before Starting
- Step-by-Step Guide: How to Change Cabin Air Filter Toyota Camry
- Common Mistakes to Avoid During the Swap
- How Often to Change Cabin Air Filter Toyota Models
- Benefits of Doing It Yourself
- Quick Tips for a Smooth Filter Change
- Expert Insights on Cabin Air Filter Care
- Final Thoughts on Keeping Your Camry Fresh
Why You Should Learn How to Change Cabin Air Filter Toyota Camry
Your car works hard every day. It carries you to work, takes kids to school, and handles weekend trips. But many drivers forget about the small parts that keep the ride comfortable. One of those parts is the cabin air filter. This tiny component plays a big role in your daily drive.
The cabin air filter cleans the air that enters your car interior. It traps dust, pollen, dirt, and other harmful particles. When the filter gets clogged, the air inside your car suffers. You might notice bad smells, weak airflow, or more sneezing during spring. Learning how to change cabin air filter Toyota Camry helps you avoid these problems.
Many people think car maintenance always means expensive repairs. That is not true. Some tasks are simple and cheap. Replacing the cabin air filter is one of them. You do not need a mechanic. You do not need fancy tools. You just need a few minutes and the right filter.
This guide walks you through every step. We keep things simple and clear. You will learn where the filter lives, how to remove it, and how to install a new one. By the end, you will feel confident doing this task on your own.
Signs Your Camry Needs a New Cabin Air Filter
How do you know when it is time to swap out the old filter? Your car usually gives you clear signs. Pay attention to these common warning signals. Catching them early saves you from bigger issues later.

Visual guide about Toyota Camry cabin air filter replacement
Image source: i.ytimg.com
Weak Airflow from Vents
When the filter gets dirty, air cannot pass through easily. You may notice that your vents blow less air than before. Even on the highest setting, the breeze feels weak. This is a classic sign that the filter is blocked.
Unpleasant Odors Inside the Car
A dirty filter can hold onto moisture, mold, and trapped debris. Over time, this creates a stale or musty smell. You might notice the odor gets worse when you turn on the AC or heater. A fresh filter eliminates this problem quickly.
Increased Allergy Symptoms
If you or your passengers sneeze more often, the filter may be the cause. A clogged filter cannot trap allergens effectively. Pollen and dust slip through and fill the cabin. Changing the filter helps everyone breathe easier.
Foggy Windows That Clear Slowly
Good airflow helps defrost and defog your windows. When the filter restricts air, the system struggles to clear glass. If your windows take longer to clear, check the filter first.
HVAC System Working Harder
Your heating and cooling system must work overtime when airflow is low. This extra strain can reduce fuel efficiency over time. It also wears out blower motors faster. A clean filter keeps the system running smoothly.
Tools and Parts You Need Before Starting
One of the best things about this job is how little you need. You do not need a toolbox full of gear. Most of the time, your hands are enough. Here is what you should gather before you start.
New Cabin Air Filter
Buy the correct filter for your Camry model year. Filters vary by size and shape. Check your owner manual or an old filter to confirm the part number. You can find quality options at auto parts stores or online.
Flashlight
A small flashlight helps you see inside the glove box area. Shadows can hide clips and tabs. A quick beam of light makes the job much easier.
Soft Cloth or Small Brush
Dust and debris often fall into the filter housing. A soft cloth or brush helps you clean the area before installing the new filter. This keeps your car interior clean.
Gloves (Optional)
Some old filters are dusty or grimy. Wearing light gloves keeps your hands clean. This is optional but helpful if you are sensitive to dust.
Ten Minutes of Free Time
This job moves fast. Set aside a few minutes in your driveway or parking spot. You do not need a lift or a garage. A flat surface with good light works perfectly.
Step-by-Step Guide: How to Change Cabin Air Filter Toyota Camry
Now let us get to the main event. This process is straightforward. Follow these steps in order and you will have a fresh filter in no time. Take your time and stay gentle with the plastic parts.
Step One: Prepare Your Car
Park your Camry on level ground. Turn off the engine and remove the keys. Open the passenger door and clear out any items from the glove box. You want full access to the area without distractions.
Step Two: Open and Remove the Glove Box
Most Camry models have a glove box that stops halfway. Look for the stop arm or damper on the right side. Gently push it aside or unhook it. Then lower the glove box completely. This exposes the filter cover behind it.
If your glove box has screws, remove them carefully. Keep the screws in a safe spot so they do not roll away. Most modern Camrys use clips instead of screws, which makes the job even faster.
Step Three: Locate the Filter Cover
Once the glove box is out of the way, look for a rectangular plastic cover. This cover protects the cabin air filter. It usually sits against the back wall of the glove box area. You may need your flashlight to see it clearly.
Step 4: Remove the Old Filter
The cover often has small tabs or clips. Press these tabs to release the cover. Set the cover aside in a safe place. Now you will see the old filter sitting in a slot.
Pull the old filter straight out. Be gentle to avoid dropping debris into the housing. If the filter is very dirty, expect some dust to fall. This is normal. Use your cloth or brush to wipe the area clean.
Step 5: Check the Air Flow Direction
Before installing the new filter, look at the arrow on the old one. This arrow shows the direction of airflow. You must install the new filter with the arrow pointing the same way. Getting this wrong reduces performance and can cause noise.
Step 6: Install the New Filter
Slide the new filter into the slot. Make sure it fits snugly and aligns with the housing. The arrow should match the airflow direction you noted earlier. Do not force it. It should slide in smoothly.
Step 7: Replace the Cover and Glove Box
Once the filter is in place, snap the cover back on. Press until you hear the clips lock. Then raise the glove box and reattach any stops or screws. Test the glove box by opening and closing it a few times.
Step 8: Test the HVAC System
Start your car and turn on the fan. Set it to high and feel the airflow from the vents. It should feel strong and fresh. If everything sounds normal, you are done. Congratulations on completing your first filter swap.
Common Mistakes to Avoid During the Swap
This job is simple, but small errors can cause problems. Avoid these common mistakes to keep the process smooth and safe.
Installing the Filter Backward
The airflow arrow matters a lot. If you install the filter backward, air cannot flow properly. This reduces cooling and heating performance. Always double-check the arrow before you snap the cover back on.
Forcing the Glove Box
Plastic clips break easily. If you force the glove box or yank on the stop arm, you may crack a part. Work slowly and use gentle pressure. If something feels stuck, look for a hidden tab or screw.
Skipping the Clean-Up
Dust and leaves often collect around the old filter. If you skip cleaning the housing, debris can fall into the blower area. Take a moment to wipe the space. This small step protects your system.
Using the Wrong Filter Size
Not all filters fit all Camry models. A filter that is too large or too small will not seal properly. Check your part number before buying. When in doubt, compare the new filter with the old one side by side.
Rushing the Process
Speed is not your friend here. Rushing leads to broken clips, wrong installation, or missed steps. Give yourself ten calm minutes. A careful job lasts longer and works better.
How Often to Change Cabin Air Filter Toyota Models
Regular maintenance keeps your car healthy. The cabin air filter does not need changing every month. But it also should not be ignored for years. A good rule of thumb helps you stay on track.
Most experts suggest checking the filter once a year. If you drive in dusty areas or heavy traffic, check it more often. City driving, pollen season, and rough roads all fill filters faster. A quick visual check takes only a few seconds once the glove box is down.
Many drivers replace the filter every twelve to twenty thousand miles. Others wait until they notice weak airflow or bad smells. Both approaches work. The key is to pay attention and act before the filter gets completely clogged.
If you are unsure about the best schedule for your Camry, you can read our guide on how often to change cabin air filter Toyota. It breaks down the ideal timing based on driving habits and environment.
Benefits of Doing It Yourself
Why do this job yourself when a shop can handle it? The answer is simple. DIY saves money, builds confidence, and gives you control over your car care.
A mechanic may charge labor fees for a simple filter swap. That adds up over time. When you do it yourself, you only pay for the filter. The rest is your time and effort. Over the life of your Camry, those savings really add up.
You also learn more about your vehicle. Every small repair teaches you something new. Soon, checking fluids, replacing wipers, and swapping filters feel normal. This knowledge helps you spot problems early and avoid surprise repairs.
There is also the satisfaction factor. Completing a task with your own hands feels good. You know the job was done right because you did it. That peace of mind is worth more than a quick trip to the shop.
Quick Tips for a Smooth Filter Change
Use these helpful tips to make your first filter change even easier. They come from real experience and save time.
- Take a photo first: Snap a picture of the old filter before removing it. This helps you remember the airflow direction.
- Buy a quality filter: Cheap filters may tear or clog faster. A good filter lasts longer and filters better.
- Work in good light: A bright area helps you see clips, tabs, and arrows clearly.
- Keep a trash bag nearby: Old filters and debris go straight into the bag. This keeps your car clean.
- Label the filter date: Write the install date on the new filter with a marker. This helps you track when to check it next.
Expert Insights on Cabin Air Filter Care
Experienced mechanics and car enthusiasts agree on one thing. Small maintenance tasks protect big systems. The cabin air filter is a perfect example. It is small, but it affects comfort, health, and system life.
Experts also recommend paying attention to seasonal changes. Spring brings pollen. Fall brings dry leaves and dust. Winter can trap moisture in the system. Checking the filter at the start of each season is a smart habit.
Another expert tip is to inspect the housing for cracks or gaps. A damaged housing lets unfiltered air bypass the filter. If you see cracks, replace the cover or address the issue before installing a new filter. This keeps your air clean and your system efficient.
Final Thoughts on Keeping Your Camry Fresh
Your Toyota Camry deserves simple care. Fresh air, strong airflow, and a clean interior make every drive better. Changing the cabin air filter is one of the easiest ways to protect your comfort. It costs little, takes minutes, and delivers real results.
Now you know exactly how to change cabin air filter Toyota Camry without stress. You understand the signs of a dirty filter, the tools you need, and the steps to finish the job. You also know the common mistakes to avoid and the best habits to follow.
Take a few minutes this weekend and give your Camry some love. Your lungs, your HVAC system, and your wallet will thank you. A fresh filter is a small change that makes a big difference every time you drive.
Frequently Asked Questions
How long does it take to change the cabin air filter on a Toyota Camry?
It usually takes about ten to fifteen minutes. The job is simple and does not require special tools. Most of the time goes toward locating the filter and swapping it carefully.
Where is the cabin air filter located in a Toyota Camry?
The filter sits behind the glove box on the passenger side. You access it by lowering the glove box and removing a small plastic cover. This location is standard for most Camry model years.
What happens if I install the cabin air filter backward?
Installing the filter backward reduces airflow and hurts HVAC performance. The system may feel weak and make unusual noises. Always match the airflow arrow on the new filter to the original direction.
How often should I replace the cabin air filter in my Camry?
Most drivers should check the filter once a year. Replacement is often needed every twelve to twenty thousand miles. Dusty conditions, heavy traffic, and allergy season may require more frequent changes.
Can a dirty cabin air filter affect my AC performance?
Yes, a clogged filter restricts airflow and makes the AC work harder. This can reduce cooling power and strain the blower motor. A clean filter helps the system run efficiently.
Do I need any special tools to change the cabin air filter?
No special tools are required for most Camry models. You may only need a flashlight, a soft cloth, and maybe a small brush. Some glove boxes use screws, so a basic screwdriver can help.