Replacing a burnt-out headlight on your Nissan Altima is simpler than you think. With the right tools and a few basic steps, you can restore clear nighttime visibility without visiting a shop. This guide walks you through the exact process, highlights common pitfalls, and shows you how to handle different Altima generations safely. You will also learn when to check fuses, how to avoid touching the glass, and what to do if the new bulb still does not light up. Let us get your lights back on the road.
Night driving should feel safe and clear. When one headlight dims or goes out, your visibility drops fast. The good news is that how to replace headlight bulb Nissan Altima is a task many owners can handle at home. You do not need advanced mechanical skills. You just need the right bulb, a few simple tools, and a calm approach. This guide breaks the job into small, easy steps so you can finish quickly and drive with confidence again.
Many people put off headlight repairs because they picture a complicated teardown. In reality, most Nissan Altima models give you direct access to the bulb from behind the housing. That means no heavy disassembly in most cases. If you have ever changed a light fixture at home, you can do this. The key is to move carefully, avoid forcing parts, and keep the new bulb clean. Let us walk through everything you need to know.
Key Takeaways
- Safety first: Always work on a cool engine, wear gloves, and disconnect the battery when possible to prevent shocks or short circuits.
- Know your generation: Headlight access varies between older and newer Nissan Altima models, so identify your year before starting.
- Use the correct bulb: Match the exact part number for low beam, high beam, or dual-filament bulbs to ensure proper fit and brightness.
- Never touch the glass: Oils from your skin can shorten bulb life, so handle halogen bulbs by the base or use a clean cloth.
- Test before reassembly: Reconnect power and verify the new bulb works before sealing everything back up.
- Check related parts: If the bulb still fails, inspect the fuse, relay, and wiring to rule out electrical issues.
- Keep it simple: Most Altima headlight swaps take under thirty minutes with basic hand tools and patience.
📑 Table of Contents
- What You Need Before You Start
- Understanding Your Nissan Altima Headlight Setup
- Step-by-Step Guide to Replace the Headlight Bulb
- Troubleshooting When the New Bulb Does Not Work
- Safety, Best Practices, and Long-Term Care
- How Long It Takes and What to Expect
- Final Thoughts on How to Replace Headlight Bulb Nissan Altima
What You Need Before You Start
Preparation saves time and prevents frustration. Before you pop the hood, gather the basics and confirm the correct parts for your car. A smooth job starts with the right setup.
Tools and Supplies
Keep your workspace simple. You likely already have most of these items:
- Replacement bulb: Match your exact Altima year and trim for low beam, high beam, or combination bulbs.
- Gloves: Nitrile or clean latex gloves protect the bulb glass from skin oils.
- Screwdrivers: A flathead and a small Phillips screwdriver cover most fasteners.
- Socket set or wrenches: Some models use small bolts to secure the housing or cover.
- Flashlight: A bright light helps you see clips, wires, and tight corners.
- Cleaning cloth: A lint-free cloth helps wipe surfaces without leaving residue.
Choosing the Right Bulb
Not all bulbs are the same. Your Altima may use different types for low and high beams. Check your owner manual or the old bulb’s part number before buying. If you want brighter light, consider quality halogens first. They are affordable and easy to install. If you are thinking about upgrades, research compatibility carefully so you do not overload the circuit or create glare.
Quick Tip: Buy from a reputable seller and keep the packaging until installation. This helps you confirm the part number and return the bulb if it does not fit.
Understanding Your Nissan Altima Headlight Setup
The Altima has been around for many generations, and access can vary slightly by year. In most cases, you reach the bulb from behind the headlight housing. Some models use a removable cover, while others use a small clamp or retainer ring. Once you know what you are looking at, the job becomes much easier.
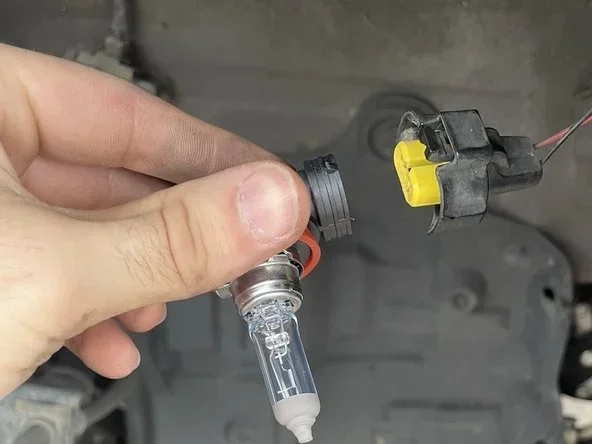
Visual guide about Nissan Altima headlight bulb replacement
Image source: guide-images.cdn.ifixit.com
Common Access Points
Here is what you will usually see behind the housing:
- Rubber dust cover: A flexible cap that pulls off or twists loose to expose the bulb.
- Metal or plastic retainer: A clip or ring that holds the bulb in place.
- Wire connector: A plug that attaches to the bulb base and supplies power.
- Housing opening: The sealed area where the bulb sits and the light shines through.
Why Generations Matter
Older Altimas often provide straightforward access. Newer models may place more components close together, so you need to move gently and keep track of small parts. If your car has a plastic cover over the top of the housing, you may need to remove a few fasteners first. The goal is the same in every case: expose the bulb, swap it, and reseal everything properly.
Expert Insight: Before you start, look at the area with a flashlight. Identify the dust cover, connector, and retaining clip. Knowing the layout first prevents guesswork and reduces the chance of breaking a clip.
Step-by-Step Guide to Replace the Headlight Bulb
This is the core of the job. Follow the sequence below and take your time. If something feels stuck, stop and reassess rather than forcing it.
1. Prepare the Vehicle
Park on level ground and turn off the engine. Let the hood cool if the car has been driven. If you want extra safety, disconnect the negative battery terminal. This is not always required for a bulb swap, but it adds peace of mind when working around electrical connections.
2. Open the Hood and Locate the Headlight
Lift the hood and secure it with the prop rod or latch. Stand in front of the affected headlight and look toward the back of the housing. Use your flashlight to trace the wiring harness. You should see a bundle of wires leading to a plug near the bulb area.
3. Remove the Dust Cover or Access Panel
Many Altimas use a rubber or plastic cover over the back of the bulb. Pull it off straight or twist it counterclockwise if it is threaded. If there is a small metal clip, release it carefully. Keep the cover in a safe spot so it does not roll away.
4. Disconnect the Wire Connector
Find the plug attached to the bulb base. Press the locking tab if there is one, then pull the connector straight off. Do not tug on the wires. Hold the plug body and slide it free. If it feels stubborn, wiggle gently while applying steady pressure.
5. Release the Bulb Retainer
Some models use a metal ring or plastic clip to hold the bulb. Unclip it or unscrew it, depending on the design. The bulb should now lift out freely. If it resists, check for a hidden tab or a second fastener you may have missed.
6. Install the New Bulb
Pick up the new bulb by the base or wear gloves. Avoid touching the glass. Insert the bulb into the housing and align it correctly. Refit the retainer or clip so the bulb sits firmly in place. It should feel secure without being forced.
7. Reconnect the Wire Harness
Slide the connector back onto the bulb base until it clicks or seats fully. Make sure the locking tab engages. A loose connection can cause flickering or no light at all.
8. Replace the Cover and Test
Put the dust cover or access panel back on. Make sure it seals well so moisture does not get inside. Reconnect the battery if you disconnected it. Turn on the headlights and check both low and high beams if your bulb supports both. Verify the new light is bright and steady.
Common Mistakes:
- Touching the bulb glass with bare hands
- Forcing the connector instead of pressing the release tab
- Skipping the test before reassembly
- Using the wrong bulb type or wattage
- Leaving the dust cover loose, which can let in moisture
Troubleshooting When the New Bulb Does Not Work
Sometimes the swap looks perfect, but the light still fails. That usually points to a simple electrical issue rather than a bad bulb. Work through the basics before assuming the worst.
Check the Fuse First
A blown fuse is one of the easiest things to miss. Find the fuse box, usually under the hood or inside the cabin. Use the diagram to locate the headlight fuse. Pull it and inspect the metal strip inside. If it is broken, replace it with one of the same rating. If the new fuse blows quickly, there may be a short or wiring problem that needs professional attention.
Inspect the Connector and Wiring
Look for corrosion, bent pins, or loose terminals. A poor connection can block power even with a good bulb. If the plug looks dirty, clean it gently and check that it seats fully. Also examine the wire for cracks or signs of wear, especially near the housing where heat and vibration can take a toll.
Verify the Bulb Itself
Not every new bulb is perfect out of the box. If possible, test the bulb in a known working socket or compare it with the other side. If the replacement is defective, exchange it right away. This saves time and avoids unnecessary guesswork.
Look at the Relay or Switch
If both low and high beams fail on the same side, the issue may involve a relay, switch, or body control module on some models. That is more complex than a bulb swap. If basic checks do not solve it, a qualified technician can help trace the signal and confirm the fault.
Quick Tip: Keep a small fuse tester or a multimeter in your toolbox. They make it easier to confirm power and ground without guessing.
Safety, Best Practices, and Long-Term Care
A good repair is not just about getting the light on. It is also about doing it safely and keeping the system reliable. A few simple habits go a long way.
Handle Bulbs with Care
Halogen bulbs get hot and are sensitive to contamination. Skin oils can create hot spots on the glass and shorten bulb life. Always handle the bulb by the base or use clean gloves. If you accidentally touch the glass, wipe it with a lint-free cloth and a little isopropyl alcohol before installing.
Protect the Housing and Seal
The headlight housing is designed to keep out moisture and debris. When you reinstall the dust cover or panel, make sure it snaps or twists into place fully. A poor seal can lead to fogging, which reduces light output and may cause corrosion over time.
Avoid Over-tightening
Plastic clips and retainer rings can crack if you squeeze too hard. Snug is enough. If a fastener feels resistant, check the orientation before applying more force. Patience prevents broken parts and extra trips to the store.
Keep Your Headlights Clean
Clear lenses make a big difference. Dirt, road film, and oxidation can dim the light even when the bulb is strong. Wash the lenses regularly and inspect them for haze or yellowing. If the plastic becomes cloudy, a gentle restoration treatment can improve visibility again.
When to Consider a Professional
Most bulb changes are straightforward. However, if the housing is damaged, the connector is melted, or the electrical check points to a deeper fault, it may be time to get help. A professional can also assist if your vehicle uses complex lighting controls or if both sides fail at once.
How Long It Takes and What to Expect
For most owners, this is a short job. Once you have the bulb and the tools, the actual swap often takes less than thirty minutes per side. The first time may take a little longer because you are learning the layout. That is normal. The second headlight usually goes faster because you already know the steps.
You may encounter a tight clip or a stubborn cover, especially on newer models. If that happens, slow down and look closely. A small flashlight and a steady hand make a huge difference. The process is simple, but it rewards careful work.
Final Thoughts on How to Replace Headlight Bulb Nissan Altima
Learning how to replace headlight bulb Nissan Altima is a practical skill that saves time, money, and hassle. With the right bulb, a few basic tools, and a careful approach, you can restore full visibility and drive safely again. Remember to match the correct part, avoid touching the glass, and test the light before you close everything up. If the new bulb does not work, check the fuse and connections first. Most issues are simple and fixable at home.
Take your time, keep the workspace organized, and do not rush the final seal. A clean install protects the housing and helps the new bulb last longer. Once you finish, you will enjoy brighter light and peace of mind on every night drive.
Frequently Asked Questions
How do I know which headlight bulb my Nissan Altima needs?
Check your owner manual or look at the old bulb’s part number before buying. You can also search by your Altima’s model year and trim to confirm the correct low beam, high beam, or dual-filament bulb.
Can I replace the headlight bulb without disconnecting the battery?
Yes, many owners replace the bulb without disconnecting the battery. Still, disconnecting the negative terminal adds safety if you want to avoid accidental short circuits while working near electrical connections.
Why should I avoid touching the new bulb with my hands?
Skin oils can leave residue on the glass, which may create hot spots and shorten the bulb’s life. Handle the bulb by the base or wear clean gloves, and wipe it with alcohol if you accidentally touch the glass.
What should I do if the new headlight bulb still does not light up?
Start by checking the headlight fuse, then inspect the connector and wiring for loose pins or corrosion. If everything looks good, test the bulb in another socket or try a replacement to rule out a defective part.
Is it normal for the headlight housing to feel tight when I remove the cover?
Yes, dust covers and retainers can feel snug, especially on newer models. Use a flashlight, identify the fastener type, and release it gently instead of forcing it to avoid cracking plastic parts.
Do I need to replace both headlight bulbs at the same time?
It is not required, but replacing both sides can give you even lighting and reduce the chance of doing the job twice later. If one bulb is old or dim, the other may be near the end of its life too.