
Replacing a worn-out bulb is simple and saves you money. This guide shows you exactly how to change Toyota Corolla headlight assemblies and bulbs without professional help. You will learn the right tools, safety steps, and quick troubleshooting tricks. Follow these clear instructions to restore bright, safe visibility on the road.
Key Takeaways
- Safety first: Always disconnect the battery and let the engine cool before touching any electrical components.
- Know your bulb type: Identify whether your Corolla uses halogen, HID, or LED bulbs to buy the correct replacement.
- Handle bulbs with care: Avoid touching glass surfaces with bare fingers to prevent premature failure and hotspots.
- Check the housing: A damaged or cloudy headlight lens can ruin visibility even with a fresh bulb.
- Test before reassembly: Always verify the new bulb works before bolting everything back together.
- Keep it legal: Ensure replacement bulbs meet local road safety standards and proper beam patterns.
- Regular maintenance: Inspect headlights during routine oil changes and seasonal checkups for early wear signs.
📑 Table of Contents
- How to Change Toyota Corolla Headlight: A Complete DIY Guide
- Gather the Right Tools and Parts
- Understand Your Corolla Headlight Assembly
- Step-by-Step: How to Change Toyota Corolla Headlight Bulb
- Common Mistakes to Avoid
- When to Replace the Whole Headlight Assembly
- Headlight Maintenance and Longevity Tips
- Final Thoughts on How to Change Toyota Corolla Headlight
How to Change Toyota Corolla Headlight: A Complete DIY Guide
Driving with dim or dead headlights is risky and frustrating. You might miss road signs, struggle on dark highways, or fail a safety inspection. The good news is that how to change Toyota Corolla headlight components is a straightforward task. You do not need a mechanic or expensive tools. With a little patience, you can restore bright, reliable lighting in under an hour.
This guide walks you through every step. We cover bulb types, tool lists, safe removal steps, installation tips, and common pitfalls. You will also learn how to spot housing damage, test your new bulbs, and keep your lights working longer. Whether you drive a newer sedan or an older model, the process stays similar. Let us get started.
Gather the Right Tools and Parts
Before you touch anything, collect the correct supplies. Rushing into the job without proper gear leads to stripped screws, broken clips, or damaged wiring. A smooth repair starts with preparation.
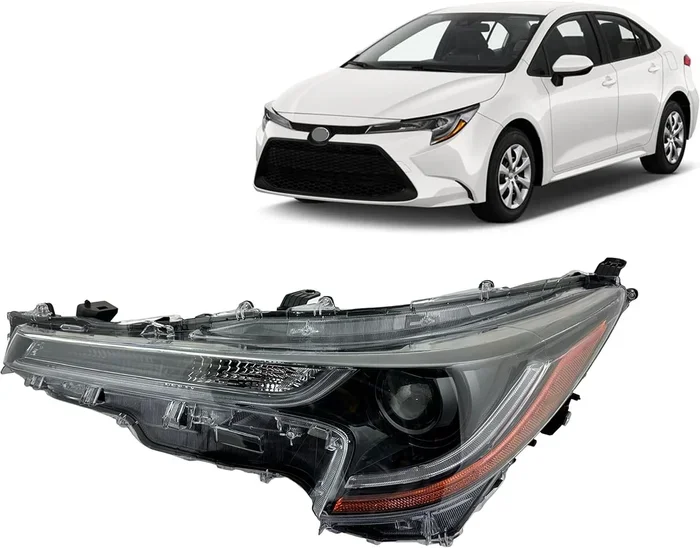
Visual guide about Toyota Corolla headlight replacement
Image source: m.media-amazon.com
You will need a few basic items. Most Corolla owners can finish the job with simple hand tools. Here is what to keep nearby:
- Replacement bulbs: Check your owner manual or old bulb code for the exact type.
- Screwdriver set: Flathead and Phillips heads cover most trim and bracket screws.
- Socket or wrench set: Some models require a small socket for fasteners.
- Trim removal tool: Plastic pry tools protect clips and paint from scratches.
- Gloves: Clean nitrile or cotton gloves keep oils off the glass.
- Cleaning cloth: A soft microfiber towel helps wipe dust and debris.
- Battery disconnect tool: A wrench for the negative terminal adds safety.
Choose the correct bulb before anything else. Halogen bulbs are common on many Corolla trims. Some newer models use LED or HID units. Halogen bulbs are affordable and easy to swap. LED and HID systems may require module checks or professional calibration. If your car uses sealed projector assemblies, you might need a full housing replacement instead of a simple bulb swap.
Keep your model year in mind. Earlier Corollas often use twist-lock sockets behind the front fascia. Later models may hide fasteners under the hood edge or inside the wheel well. A quick visual check saves time. Shine a flashlight around the outer housing and look for access points. If you need help reaching the engine bay area, you can review how to open the hood of a Toyota Corolla for a safer workspace.
Pick the Correct Bulb Type
Not all bulbs fit the same way. The connector shape, base size, and wattage must match your vehicle. Using the wrong part can cause poor beam focus or electrical strain. Check the old bulb label before ordering a replacement. Common codes appear on the glass or metal base. Write the code down and compare it with the new packaging.
If you are unsure, remove the old bulb first. Bring it to an auto parts store for a direct match. This simple step prevents compatibility headaches. It also helps you confirm whether your car uses a single bulb for low and high beams or separate units for each mode.
Prepare a Clean Workspace
Work in a bright, dry area. Park on level ground and set the parking brake. A tidy workspace reduces dropped screws and misplaced clips. Lay down a small towel to catch fasteners. Keep your phone nearby for reference photos. Taking pictures before removing parts makes reassembly much easier.
Understand Your Corolla Headlight Assembly
Knowing the layout helps you avoid guesswork. The headlight housing holds the bulb, reflector, lens, and wiring. Some models add a separate high beam, turn signal, or daytime running light within the same unit. Each piece connects differently. Understanding these parts keeps the process organized.
The outer lens is usually made of polycarbonate plastic. Over time, sun exposure and road debris can cloud the surface. A cloudy lens scatters light and reduces visibility. If the lens looks hazy, consider a cleaning kit or professional restoration. A fresh bulb cannot fix a damaged housing. You may also want to inspect other routine items while you are in the engine bay, such as how often to change the engine air filter Toyota for overall vehicle care.
Low Beam vs. High Beam Layout
Many Corollas use one housing with two bulb functions. The low beam handles everyday night driving. The high beam supports dark roads and passing situations. Some designs use a single bulb with a dual filament. Others use two separate bulbs. Check your layout before buying parts. A dual-filament bulb swaps in one step. Separate bulbs require two replacements if both are worn.
Turn Signals and Daytime Running Lights
Some assemblies integrate the front turn signal or daytime running light. These lamps may share the housing or sit beside the main headlight. If your turn signal flickers or looks dim, inspect that bulb too. Replacing it often uses the same access method. Keep the wiring connectors straight and never force a plug that does not fit.
Step-by-Step: How to Change Toyota Corolla Headlight Bulb
Now comes the core of the job. Follow the steps in order. Move slowly and keep track of every screw and clip. If a part resists, stop and check for a hidden fastener. Forcing components usually causes more damage.
1. Disconnect the Battery
Safety matters first. Turn off the engine and remove the key or key fob from the area. Open the hood and locate the negative battery terminal. Disconnect it with the proper wrench. This step prevents accidental short circuits while you handle wiring. If you also need to handle electronic accessories, you might find it useful to review how to connect Toyota app to car for general system awareness, though the battery disconnect is the key safety action here.
2. Access the Back of the Headlight
Reach behind the outer housing. On many Corollas, you can access the bulb from under the hood without removing the entire assembly. Some trims require partial trim removal. Use a plastic pry tool to lift clips gently. Keep your hands clear of hot surfaces and moving parts. If you need a wider view of the front area, you can learn how to open the hood Toyota Corolla for a more comfortable working position.
3. Remove the Dust Cover and Connector
Locate the rubber or plastic dust cover behind the bulb. Twist or unclip it, depending on the design. Set it aside in a safe spot. Next, unplug the electrical connector. Some connectors release with a small tab. Others need a gentle wiggle while pulling straight back. Never yank the wires. If the plug feels stuck, check for a locking lever or retaining clip.
4. Release the Bulb Retainer
Most halogen bulbs stay in place with a metal wire bracket or a twist-lock ring. Rotate the ring counterclockwise if your model uses that style. If a wire bracket holds the bulb, lift it carefully. The bulb should come free without much force. If it resists, look for corrosion or a misaligned clip. Clean minor debris with a soft brush, but do not scrape the socket.
5. Install the New Bulb
Handle the new bulb with gloves or a clean cloth. Avoid touching the glass with bare skin. Oils from your hands can create hot spots and shorten bulb life. Insert the bulb into the socket the same way the old one came out. Align the tabs and rotate the ring or secure the bracket. Make sure the fit feels snug and centered.
6. Reconnect the Wiring and Cover
Plug the electrical connector back in until it clicks or sits fully seated. Check the rubber seal around the back of the housing. A good seal keeps moisture out and protects the bulb. Replace the dust cover and secure any clips or screws you removed. Tighten fasteners gently. Over-tightening can crack plastic parts.
7. Test the New Headlight
Reconnect the negative battery terminal. Turn on the lights and verify both low and high beams work. Walk around the car and check the beam pattern. The light should appear even and focused. If the bulb flickers or does not turn on, inspect the connector and fuse. A simple loose plug is the most common cause of early failure.
Common Mistakes to Avoid
Even a simple repair can go sideways if you rush. Watch for these frequent errors. Avoiding them keeps your headlights bright and reliable.
- Touching the bulb glass: Skin oils reduce bulb life and cause uneven heating.
- Forcing connectors: Pulling wires instead of the plug damages terminals.
- Skipping the battery disconnect: Live power increases the risk of shorts.
- Using the wrong bulb: Poor fitment leads to weak beams and socket wear.
- Ignoring the housing seal: Missing or cracked seals let in moisture and dirt.
- Reusing damaged clips: Brittle plastic breaks easily and leaves gaps.
- Skipping the test step: Always verify operation before finishing the job.
If your lights still look weak after swapping the bulb, inspect the lens and wiring. A faded lens can make a good bulb seem dim. Also check the fuse box for a blown fuse. Sometimes the issue is not the bulb at all. If you notice recurring electrical quirks, you may want to learn how to remove maintenance required on Toyota Corolla as part of broader dashboard awareness.
When to Replace the Whole Headlight Assembly
A bulb swap solves most lighting problems. Sometimes the housing itself is the issue. Cracks, heavy moisture, burnt connectors, or severe lens clouding may call for a full replacement. A damaged assembly can leak water and corrode contacts. In that case, a new housing restores protection and beam quality.
You have two main options. You can buy a complete headlight assembly or repair the existing one. Complete assemblies are easier to install but cost more. Repairs work well for minor lens haze or small cracks. If the reflector is scratched or the housing is broken, replacement is usually the better choice. Always compare beam alignment after installing a new unit. Misaligned lights reduce visibility and can blind other drivers.
Signs You Need a Full Replacement
Look for these warning signs. If you see them, consider a new housing instead of another bulb.
- Cracked or broken lens: Impact damage weakens the seal and spreads quickly.
- Heavy condensation: Water pooling inside the housing signals a failed seal.
- Corroded connectors: Green or crumbly terminals disrupt power flow.
- Scratched reflector: Deep marks scatter light and reduce beam focus.
- Melted housing areas: Overheating or previous electrical faults can deform plastic.
Headlight Maintenance and Longevity Tips
Good headlights last longer with simple care. Make lighting checks part of your routine. A few minutes of attention prevents roadside surprises. Clean the lens regularly with a mild automotive cleaner. Avoid harsh household chemicals that can damage the coating. Park in shade when possible to reduce sun damage.
Check your lights during seasonal prep. Cold weather and road salt can wear down seals and lenses. Summer heat can accelerate yellowing. If you perform other routine tasks, such as checking how often change synthetic oil Toyota schedules, add a light check to the same visit. Pair it with other small inspections to save time.
Quick Cleaning and Protection Routine
Use a soft cloth and approved cleaner to wipe the lens. Work in straight lines and avoid abrasive pads. If the surface starts to yellow, a restoration kit can help. Follow the product steps carefully and rinse well. After cleaning, a protective spray or wax made for plastics can slow future oxidation. Keep the area around the housing dry and free of packed dirt.
Beam Alignment Basics
Proper aim matters as much as bulb brightness. A misaligned beam reduces your view and can glare into other drivers’ eyes. Many Corollas include adjustment screws near the housing. Park on level ground a few feet from a wall and mark the beam height. Adjust slowly and test the pattern. If you are unsure, a shop can align the lights quickly.
Final Thoughts on How to Change Toyota Corolla Headlight
Learning how to change Toyota Corolla headlight bulbs gives you confidence and keeps your drives safer. The job is simple when you use the right bulb, protect the glass from skin oils, and test the result before finishing. Take your time, keep track of small parts, and inspect the housing for damage. With a little care, your headlights will stay bright and dependable for many miles ahead.
Frequently Asked Questions
How long does it take to change a Toyota Corolla headlight bulb?
Most owners finish the job in 20 to 40 minutes. The exact time depends on your model year and how easily you can reach the back of the housing.
Do I need to remove the entire headlight assembly to replace the bulb?
Usually not. Many Corollas allow direct access from under the hood. You may only need to remove a dust cover, connector, and retainer ring.
Why does my new headlight bulb keep burning out quickly?
Frequent failure often comes from skin oils on the glass, excessive vibration, poor socket contact, or a mismatched bulb type. Handle the bulb with gloves and check the retainer fit.
Can I upgrade to brighter bulbs on my Corolla?
You can use brighter approved bulbs, but avoid exceeding your housing and electrical limits. Very high wattage may strain wiring and cause heat damage.
What should I do if the headlight still does not work after replacement?
Check the fuse, inspect the connector, and confirm the bulb is seated correctly. If the problem continues, examine the wiring for damage or corrosion.
Is it safe to drive with one headlight out?
It is not safe or legal in many areas. A single working light reduces visibility and makes your car harder to see. Replace the failed bulb as soon as possible.