
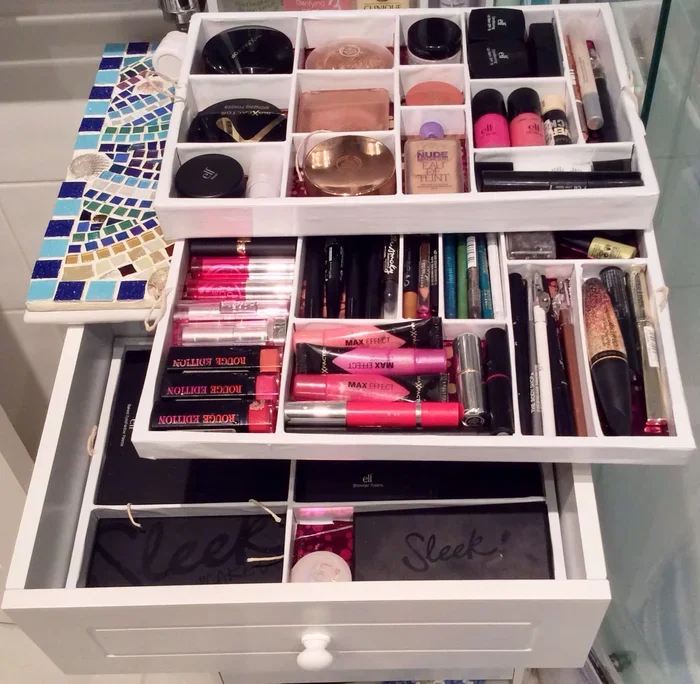
Featured image for how to organized makeup in deep drawer
Image source: i.pinimg.com
Organizing a deep drawer for makeup can feel overwhelming, but the right system turns chaos into a clean, easy-to-use space. By sorting products into clear groups, using stackable bins or dividers, and placing your most-used items within easy reach, you can build a setup that stays tidy over time. This guide walks you through a simple, step-by-step approach that works for everyday vanity clutter and larger collections alike.
If you have a deep drawer full of makeup, you probably know the feeling: you open it, everything seems buried, and finding one lip gloss can turn into a mini treasure hunt. The good news is that a deep drawer can actually be a great place for makeup storage once you give it a simple system. The trick is not to cram more into the space, but to organize what you already have in a way that makes sense for your routine.
In this guide, you will learn how to organize makeup in a deep drawer easily, even if the space feels crowded right now. We will cover how to sort your products, choose the right organizers, use vertical space without making the drawer harder to use, and keep everything in place after the first cleanup. The goal is a setup that feels calm, practical, and easy to maintain.
📑 Table of Contents
- Step One: Empty the Drawer and Take Stock
- Step Two: Measure the Drawer and Plan the Layout
- Step Three: Pick the Right Organizers for a Deep Drawer
- Step Four: Place Your Products Strategically
- Step Five: Make the Drawer Easy to See and Maintain
- Step Six: Build a Simple Maintenance Habit
- Troubleshooting Common Deep Drawer Problems
- Final Tips for Keeping the System Working
Step One: Empty the Drawer and Take Stock
The easiest way to start is to remove everything from the drawer. This gives you a clear view of the space and helps you see how much you actually own. Once the drawer is empty, wipe out dust, crumbs, or any spilled product so the surface is clean before you begin rebuilding.
Sort Everything Into Simple Groups
As you take items out, sort them into broad categories. You might create piles for lip products, eyeshadows, foundations, blushes, brushes, sponges, tweezers, lash tools, and miscellaneous items. If you have duplicates or products you no longer use, set those aside too. This is the moment to be honest about what deserves space in the drawer.
A simple sorting method works best here. You do not need a perfect system before you begin. Just group similar items together so you can see what you are working with. For example, keep all lipsticks together, all cream products together, and all small tools together. That basic structure will make the next steps much easier.
Decide What Stays in the Drawer
Not every makeup item needs to live in the same drawer. If you have products you rarely use, they may be better stored elsewhere. The deep drawer should ideally hold the items you reach for often or the products that benefit from a protected, flat space. Once you decide what stays, you will have a clearer idea of how much room you really need.
This is also a good time to check for expired or damaged products. If something has changed smell, texture, or color, or if you simply do not remember using it, it may be time to let it go. A smaller, more useful collection is much easier to organize than a drawer packed with extras.
Step Two: Measure the Drawer and Plan the Layout
Before buying bins or moving items back in, take a minute to measure the drawer. Depth matters, but width and height matter too. Knowing the exact space available helps you avoid organizers that are too tall, too wide, or awkward to remove.
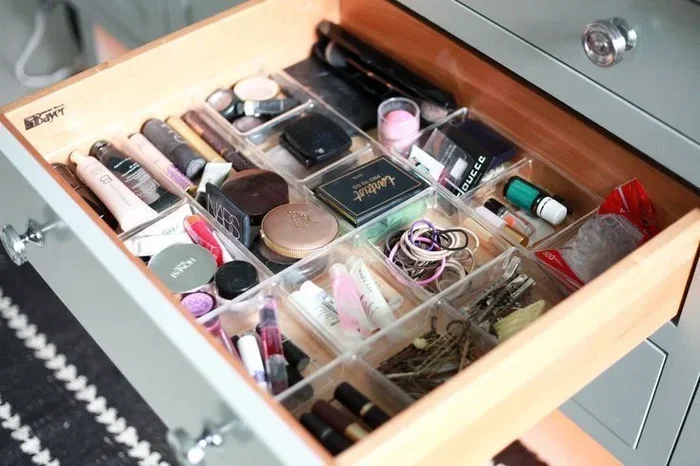
Visual guide about how to organized makeup in deep drawer
Image source: i.pinimg.com
Think in Zones
A deep drawer works best when you treat it like a small storage zone instead of one giant pile. For example, you might reserve one area for everyday products, another for tools, and a deeper section for backup items or less-used products. If the drawer is especially deep, you may want to use the front area for daily essentials and the back area for items you do not need as often.
This layout keeps the most important products easy to reach while still making use of the full drawer. The key is to avoid stacking everything so tightly that you cannot pull items out comfortably. A good layout should feel simple, not cramped.
Choose a Layout That Matches Your Routine
Think about how you actually use your makeup. If you usually apply the same few products every day, keep those near the front. If you like to browse your collection before choosing a look, an open tray or row of small containers may work better. If your drawer is shared, you might want separate sections so everyone can find their items quickly.
The best layout is the one you will keep using. A system that looks neat but feels inconvenient usually falls apart. A system that fits your habits, even if it is simpler, is far more likely to stay organized.
Step Three: Pick the Right Organizers for a Deep Drawer
Once you know what you have and how you want to arrange it, choose organizers that fit the drawer and your products. For a deep drawer, the best options are often containers that make good use of vertical space without making the contents hard to reach.
Use Bins, Trays, and Dividers
Small bins and trays are helpful because they keep categories together. A lip product bin, a brush tray, and a small container for tools can make the drawer feel much more orderly. Dividers can also help separate items in a wide drawer, especially when you want neat rows instead of mixed piles.
If the drawer is deep, look for organizers that stack securely or have a low profile. Clear containers are especially useful because they let you see what is inside without opening each one. That makes it easier to put things back in the right place.
Consider Vertical Storage Carefully
A deep drawer gives you more room front to back, but it can also tempt you to stack too much. Vertical storage can work well if you keep the most-used items easy to access. For example, you might place a shorter tray in front and a taller bin behind it, or use a container that holds several products upright.
Just make sure the taller items do not block everything else. If you have to move three containers every time you want one product, the system may become frustrating. The goal is to use the depth, not fight it.
Keep Flexibility in Mind
Your makeup collection will probably change over time. That is why flexible organizers are so useful. Adjustable dividers, removable trays, and containers that can be rearranged make it easier to update the drawer later. If you get a new product or stop using something, you can shift the setup without starting over.
A flexible system also helps if your drawer is not a perfect fit. Instead of forcing everything into one fixed arrangement, you can adapt the space to what you own now.
Step Four: Place Your Products Strategically
Now comes the part that makes the biggest difference in daily use: placing your products in a way that matches both the drawer and your routine. This is where a deep drawer can really work in your favor.
Put Daily Essentials Up Front
Place the items you use most often where you can reach them quickly. That might include your favorite lip product, a few key eye products, a go-to foundation or concealer, and the tools you use every day. When these essentials sit near the front, you spend less time searching and less time pulling everything else around.
This front area should feel like your main workspace. If you keep rearranging it, the drawer becomes harder to use. Try to keep the daily section stable so you always know where to look first.
Use the Back for Extra or Less-Used Items
The deeper part of the drawer is a good place for backup products, seasonal items, or products you use less often. For example, spare applicators, extra brushes, or specialty products you only use sometimes can sit farther back. This keeps the front area open while still making use of the full drawer.
If the back area is hard to see, clear containers or simple labels can help. You should be able to tell what is there without having to dig through everything.
Keep Related Items Together
Grouping related products makes the drawer easier to maintain. Lip products should stay with lip products, eye products with eye products, and tools with tools. When items have a clear home, it is much easier to put them back in the right place after use.
This also helps you spot duplicates. If you see five similar products in one section, you may realize you do not need all of them in the drawer. That is another chance to simplify the space.
Step Five: Make the Drawer Easy to See and Maintain
A deep drawer can look tidy on the surface and still become messy if items are hard to identify. The easier it is to see what you have, the more likely you are to keep the system working.
Use Clear Containers When Possible
Clear bins, trays, and small containers make a big difference because they reduce guesswork. You can see what belongs where, and you can tell at a glance if something has been moved. If clear containers do not fit every section, use them for the categories you want to keep most visible.
If you prefer opaque containers, that can still work as long as the arrangement is simple. The main idea is to make the drawer easy to scan so you do not have to open every container to find what you need.
Add Simple Labels or Zones
Labels are helpful when several containers look alike. You do not need anything fancy. A small label, a piece of tape, or even a consistent color code can be enough. For example, one section can be for lip products, another for brushes, and another for tools.
Labels are especially useful if more than one person uses the drawer. They make it clearer where items belong and reduce the chance of products drifting into the wrong section.
Leave a Little Breathing Room
It is tempting to fill every inch, but a drawer usually stays organized better when it is not packed too tightly. Leaving a little space makes it easier to remove containers, replace items, and adjust the layout later. If the drawer feels overstuffed, the system may become frustrating fast.
A bit of empty space also helps if you buy new products later. Instead of forcing everything into the drawer, you can add only what fits comfortably.
Step Six: Build a Simple Maintenance Habit
Even the best-organized drawer needs a little upkeep. The good news is that maintenance does not have to be a big project. A small routine is usually enough to keep the drawer from sliding back into clutter.
Do a Quick Weekly Reset
Once a week, take a few minutes to put items back where they belong. Check whether any products have drifted into the wrong section, and straighten containers if needed. This is also a good time to remove empty packaging, trash, or products you no longer want.
A short reset is much easier than waiting until the drawer becomes unmanageable again. It keeps the system working without requiring a full reorganization every time.
Adjust the Setup When Your Collection Changes
As your makeup collection changes, your drawer may need small adjustments. Maybe you add a new product line, stop using a certain tool, or realize that one category needs more room. That is normal. A good organizer setup should be easy to change when your habits change.
If a section no longer makes sense, shift it. If a bin is too large, replace it with something smaller. The point is to keep the drawer useful, not perfect.
Watch for Common Trouble Spots
Some problems tend to show up again and again. Products may get pushed to the back, containers may become mixed, or the front area may slowly fill with items that do not belong there. If that happens, do not treat it like a failure. Just reset the section and simplify it if needed.
If the drawer keeps getting messy in the same spot, that is a clue. It may mean the section is too crowded, the containers are not clear enough, or the layout does not match how you use the drawer. Small changes often solve the issue.
Troubleshooting Common Deep Drawer Problems
Even with a good plan, a deep drawer can present a few challenges. Here are some common issues and simple ways to handle them.
The Drawer Feels Too Deep to Use Comfortably
If the drawer is so deep that items disappear into the back, try creating a clearer front section. Keep your most-used products in a shallow tray or row near the front, and use the deeper space for storage that does not need to be reached every day. Clear containers can also help make the back area easier to understand at a glance.
Products Keep Getting Mixed Together
If items are sliding into each other, the categories may be too close together. Separate them with small bins, dividers, or trays. You can also reduce the number of loose items by placing smaller products into a single container instead of leaving them loose in the drawer.
There Is Too Much Stuff for the Space
If the drawer is overfilled, do not force it to hold everything. Move some items elsewhere, especially those you use less often. A deep drawer should support your routine, not become a catch-all for every product you own. Reducing the collection often makes the organization much easier.
The Setup Looks Neat but Feels Inconvenient
If the drawer looks organized but you still struggle to use it, the layout probably does not match your habits. Move the most-used items to a more accessible spot, simplify the categories, or replace a complicated arrangement with a more straightforward one. Practical use matters more than a perfectly staged look.
Final Tips for Keeping the System Working
A successful deep drawer setup is usually simple, visible, and easy to adjust. If you want the organization to last, focus on a few practical habits rather than trying to make the drawer perfect right away.
Start with the products you use most often, and give them a clear place near the front. Use bins or dividers to keep categories separate. Choose containers that help you see what is inside, and leave enough room to move things around. Then keep the drawer in good shape with a quick reset now and then.
Most importantly, treat the drawer as a working space, not a display. If a container is awkward, replace it. If a category is too crowded, simplify it. If the system helps you find what you need faster, it is doing its job.
With a little planning, a deep drawer can become one of the easiest places in your routine to use. Instead of digging through piles of makeup, you can open the drawer, spot what you need, and put it back without much effort. That is the real goal of learning how to organize makeup in a deep drawer easily: less clutter, less frustration, and a space that supports your day.