
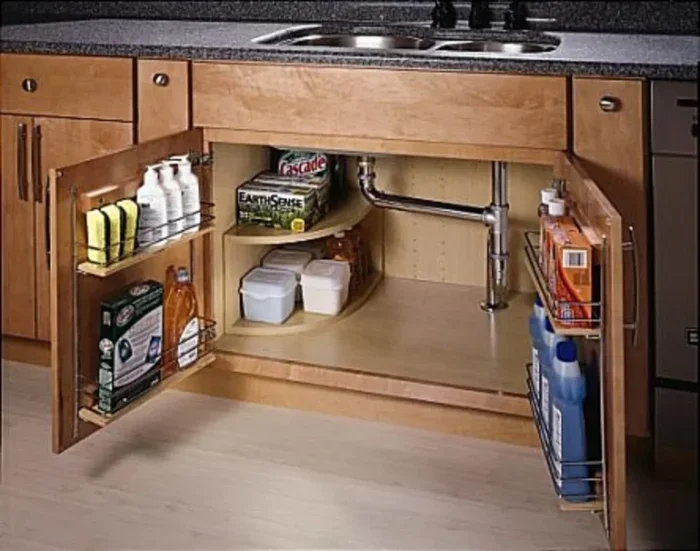
Featured image for how to under sink kitchen storage organizer
Image source: i.pinimg.com
Under-sink storage is often one of the most awkward spots in the kitchen, but a few smart changes can turn it into a highly organized space. This guide walks you through a simple process to clear clutter, choose the right containers, and set up a layout that is easy to maintain. You will learn practical ways to fit more into a cramped cabinet without creating a messy pile that is hard to reach.
If your under-sink cabinet feels like a jumble of bottles, sponges, and half-forgotten cleaning tools, you are not alone. That space is narrow, often awkward, and usually home to pipes that make storage feel tricky. The good news is that you do not need a complete remodel to improve it. With a little planning, you can turn that hidden cabinet into a cleaner, easier-to-use storage zone.
In this guide, you will learn how to maximize under-sink storage in the kitchen without making the area harder to use. We will walk through clearing the space, measuring what you actually have to work with, choosing storage pieces that fit, and arranging everything so the right items are easy to reach. The goal is simple: make the cabinet more useful, not just more crowded.
📑 Table of Contents
- Step 1: Empty the cabinet and reset the space
- Step 2: Measure the real available space
- Step 3: Decide what should live under the sink
- Step 4: Choose organizers that match your space
- Step 5: Arrange items for easy access
- Step 6: Make the setup work with pipes and a trash bin
- Step 7: Keep the system organized over time
- Troubleshooting common under-sink storage problems
- Final thoughts on under-sink organization
Step 1: Empty the cabinet and reset the space
The best way to improve under-sink storage is to start from zero. Take everything out of the cabinet and place it on a counter or table where you can see it all at once. This gives you a clear picture of what you own and what you actually use.
Sort items into simple groups
As you empty the cabinet, sort items into a few basic groups. For example, you might make piles for cleaning sprays, sponges, cloths, trash bags, paper products, and items that belong somewhere else. This makes the next steps much easier because you are no longer trying to organize blind.
Toss expired or unusable items
Check bottles, wipes, and other supplies before you put them back. If something is dried out, empty, damaged, or no longer used, it may be time to discard it. Holding onto unused products only takes up space you could use for things you reach for more often.
Clean the cabinet itself
Once the cabinet is empty, wipe down the shelves, walls, and floor of the space. This is also a good time to look for leaks, damp spots, or rust stains. If you notice moisture, it may be worth checking the plumbing before you fill the cabinet with storage items. A clean, dry base makes every organizer work better.
Step 2: Measure the real available space
Under-sink storage looks simple until you try to fit something inside it. Pipes, valves, a garbage bin, or an under-sink filtration system can all reduce the usable area. That is why measuring matters before you buy any organizers.
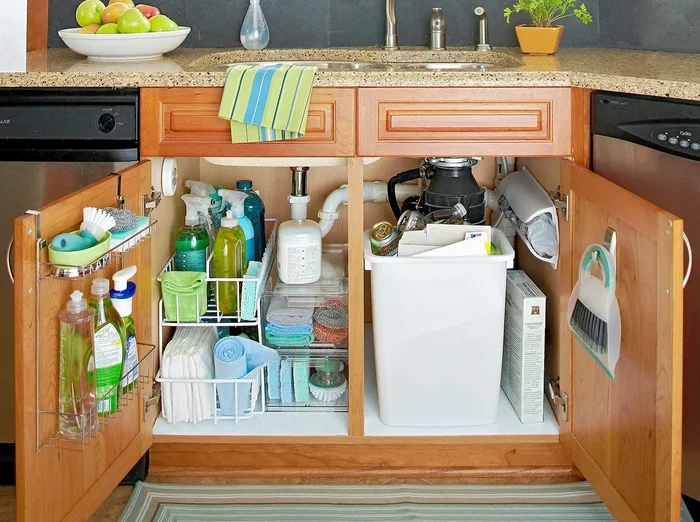
Visual guide about how to under sink kitchen storage organizer
Image source: bhg.com
Check height, width, and depth
Use a tape measure to find the usable height from the bottom of the cabinet to the shelf or lowest obstacle above it. Then measure the width and depth in the spots where you plan to place bins or racks. Write down the smallest measurements, not just the widest parts, because pipes and corners can limit what fits.
Note obstacles and awkward spots
Look for drain pipes, water lines, shutoff valves, or a trash can that already lives under the sink. These parts may leave only a partial shelf or an L-shaped area. If you understand the shape of the space, you can choose storage that fits around it instead of fighting the layout.
Think about door clearance
Open the cabinet door and watch what happens. Some organizers work well until the door closes, while others block access to the back of the cabinet. If you want to use the door itself, make sure there is enough room for hooks, racks, or adhesive bins without preventing the door from shutting properly.
Step 3: Decide what should live under the sink
Not everything belongs in the under-sink cabinet. This space works best for items you use regularly and want close at hand when you are cleaning or tidying the kitchen. The more intentional you are about what stays there, the easier it is to maximize the storage.
Keep everyday cleaning supplies nearby
Items like dish soap, a scrub brush, sponges, all-purpose cleaner, and dish towels are often good candidates for this area. These are the things you may reach for several times a week, so they deserve easy access.
Store backup items carefully
If you keep extra bottles or bulk supplies, place them where they will not block the items you use daily. Backup products can be stored on a higher shelf, in a back corner, or in a bin that is easy to slide forward when needed.
Move unrelated clutter elsewhere
Under-sink storage works best when it is not also serving as a catch-all for random household items. If you find tools, old containers, or things that belong in another room, relocate them. A focused cabinet is much easier to keep organized.
Step 4: Choose organizers that match your space
Once you know what you want to store and how much room you have, you can pick storage pieces that actually fit the cabinet. The best setup is usually a mix of bins, shelves, and racks rather than one product trying to do everything.
Use bins for grouping
Bins are useful because they keep similar items together. You might use one bin for cleaning sprays, another for cloths, and another for trash-related supplies. Clear bins can make it easier to spot what you need without pulling everything out.
Add shelves or risers if height allows
If your cabinet has enough vertical room, a small shelf or riser can create a second level of storage. That can help you separate daily items from backup items, or keep taller bottles from hiding shorter ones behind them. Just be careful not to stack things so high that the cabinet becomes hard to use.
Consider door-mounted storage
The inside of the cabinet door can be a helpful storage surface, especially when the main shelf area is limited. You might add hooks, a thin rack, or adhesive bins for lightweight items like sponges, cloths, or gloves. This works best for items that are not too heavy and do not need a deep container.
Use trays to contain spills
A shallow tray or mat can help keep bottles from sliding and make cleanup easier if a container leaks a little. This is especially useful under a sink, where small drips can create a mess over time. A tray gives you a defined area for the most spill-prone items.
Step 5: Arrange items for easy access
Storage is only helpful if you can actually reach what you need. Once your organizers are in place, arrange items with daily use in mind. The goal is to make the cabinet feel orderly without burying important supplies.
Put frequently used items in front
Place the things you grab most often where you can see and reach them quickly. For many kitchens, that means keeping everyday cleaning products at the front of a bin or on the most accessible shelf. If you have to move three other items every time you need one spray bottle, the system is probably too complicated.
Use the back for less-used items
Items you use less often can go toward the back or higher up, as long as they are still safe and easy to retrieve when needed. This keeps the front zone open for the supplies you use regularly.
Keep heavy items low and stable
Heavier containers are usually best near the bottom of the cabinet, where they are less likely to tip and easier to reach without lifting them far. This also helps the setup feel more stable, especially if you are storing larger bottles or a heavier bin.
Step 6: Make the setup work with pipes and a trash bin
Many kitchens have one or more pipes under the sink, and some also have a small trash bin in that space. These features do not have to ruin your storage plan, but they do affect it. A little flexibility goes a long way here.
Work around the plumbing
If pipes reduce the usable shelf space, look for storage that can sit beside them or wrap around the open area. Bins that are not too deep may work better than bulky ones. In some cabinets, the best solution is a layout that uses one side for bottles and another side for a trash bin or cleaning tools.
Give the trash bin a clear place
If you keep a small trash or recycling bin under the sink, make sure it does not become the reason everything else is messy. Leave enough room to pull the bin out if needed, and avoid stacking items directly on top of it in a way that makes the cabinet frustrating to use.
Stay flexible as needs change
Under-sink storage does not have to be permanent. If a new cleaning product, filter, or bin changes the layout, adjust the setup. The best organization system is one you can change without starting over every time.
Step 7: Keep the system organized over time
A well-organized cabinet can become cluttered again if no one maintains it. The good news is that under-sink storage usually only needs a small amount of regular attention to stay usable.
Do a quick reset after cleaning
When you finish a big cleaning session, put items back in the same place each time. If a bottle is empty, refill it or set it aside for replacement instead of leaving it in the cabinet. Small habits like this prevent the area from slowly becoming messy again.
Check for leaks and moisture
Since this cabinet is near plumbing, it is smart to glance inside from time to time. If you notice dampness, smells, or a new stain, investigate it early. Storage works best in a space that is dry and clean.
Simplify when you can
If the cabinet starts feeling overcrowded, look for items you no longer need. Sometimes the easiest way to maximize storage is not adding more organizers, but reducing what you keep. A simpler setup is often easier to maintain.
Troubleshooting common under-sink storage problems
Even with a good plan, some under-sink cabinets are still difficult. Here are a few common problems and practical ways to handle them.
The space feels too narrow
If the cabinet is tight, focus on shallow bins and vertical organizers instead of wide containers. Narrow storage pieces can fit into limited gaps more easily, especially beside pipes or a trash bin.
Items keep getting lost in the back
If things disappear into the cabinet, use bins or labels so you can pull out one container instead of digging around. A clear system makes it easier to see what you have without moving everything.
The cabinet smells musty
A musty smell may come from moisture, leftover sponges, or supplies that have spilled. Empty the cabinet, clean it thoroughly, dry it well, and store sponges or leak-prone items in a way that keeps them from sitting in dampness.
There is too much to fit
If the cabinet is simply full, reduce the number of items stored there. Keep only the essentials under the sink and find another spot for backups or rarely used products. Maximizing storage sometimes means being selective, not packing in more.
Final thoughts on under-sink organization
Learning how to maximize under-sink storage in the kitchen does not require a complicated makeover. Usually, the best results come from a clear-out, a careful measurement, and a setup that matches the way you actually use the space. When cleaning supplies, trash items, and backup products each have a sensible place, the cabinet becomes much easier to live with.
The most useful under-sink storage is not the one that holds the most items. It is the one that makes everyday cleaning faster, keeps spill-prone products contained, and stays organized without constant effort. Start with a simple system, adjust it to your pipes and cabinet shape, and keep it lightweight enough that you can maintain it with very little hassle.